Monday, January 5, 2015

2014 Year in Review

The last six months have been a lot of fun for Amy and me, as we got back into home brewing after a very long hiatus. We brewed seven beers in 2014:


One of the fun things brewing this year was that we got to involve some of our family as well. We brewed the dunkel with Amy's Uncle Harold and the oatmeal stout with Paul's brother Craig. We also managed to get our finished beers (and sometimes our not-so-finished beers) into the hands of family and friends so that more people could share in the tasting. Amy and I are both looking forward to brewing more beers with family and friends in 2015.

Another fun thing about brewing this year was how much we're learning. It seems like there's a wealth of information out there, and it's so much fun to soak it all up - not just to apply to our brewing but also as beer lovers in general. I know so much more about brewing and beer now compared to six months ago.

The process of tweaking the brew setup with each beer has also been a lot of fun. The BeerSmith software has so many calibration options, and with each brew we get more information about how to set the numbers to get each beer closer to the desired result from the recipe. There's also a DIY aspect of home brewing that's really cool, with each person's home brew setup being slightly different. We started out with a pretty minimal setup, but have gradually worked our way up to a great set of home brew equipment for stove-top brewing up to 3-gallon all-grain batches.

As of the start of 2015, here is our current brewing equipment:

  • Brew Day:
    • 8-gallon MegaPot 1.2
    • 5-gallon kettle
    • BIAB bag from bagbrewer.com
    • 5.2 mash pH stabilizer
    • thermometer
    • long stirring spoons
    • 12" strainer
    • scale (up to 11 lbs with 1g resolution)
    • 2nd scale (up to 1.3 lbs with 0.1g resolution)
    • irish moss
    • copper immersion wort chiller
    • sanitizer, bucket, and spray bottle
    • auto-siphon
    • hydrometer and test tube
    • refractometer
    • aerating stirrer
  • Fermentation:
    • 6.5 gallon bucket with lid
    • 3-piece airlocks
    • stoppers
    • two 1-gallon glass carboys
    • one 3-gallon glass carboy
    • 5 cu. ft. chest freezer
    • Johnson A419 temperature controller
    • lasko personal space heater
  • Bottling:
    • bottle capper
    • bottle washer
    • bottle drying tree
    • bottling bucket with valve
    • spring tip bottle filler
    • 12oz bottles
    • 22oz bottles
    • bottle caps


Here's to a fun half-year of brewing in 2014 and looking ahead to a great 2015 filled with more delicious beer!

Friday, December 26, 2014

Westvleteren Abt 12 Brew Day

With all the time we had off work for Christmas this year, we decided to spend a day brewing another beer. This was our first time brewing with our new 8-gallon MegaPot and BIAB bag (from bagbrewer.com). This was only our second all-grain batch, but we went big with Westvleteren Abt 12 from Beer Captured - a 10% ABV Belgian strong dark ale that involved over 12 pounds of grain.

We started the brew day at about 10:00 am with a 90 minute mash. We were shooting for a mash temperature of 150 F and had the water up to the strike temperature, but it took us a little bit to figure out the best way to hold the edge of the brew bag around the lip of the pot. We were also worried that the 6.25 gallons of water wouldn't fit in the pot with all that grain, so we started with only 5 gallons in the pot. It turned out all 6.25 gallons did fit, so that was a plus. By the time we got the grains in and all the water, the mash temperature ended up being in the mid 140s. I'm not sure if it's from the strike water being too low, or the added water being too cool, or the time it took to get the bag setup figured out.

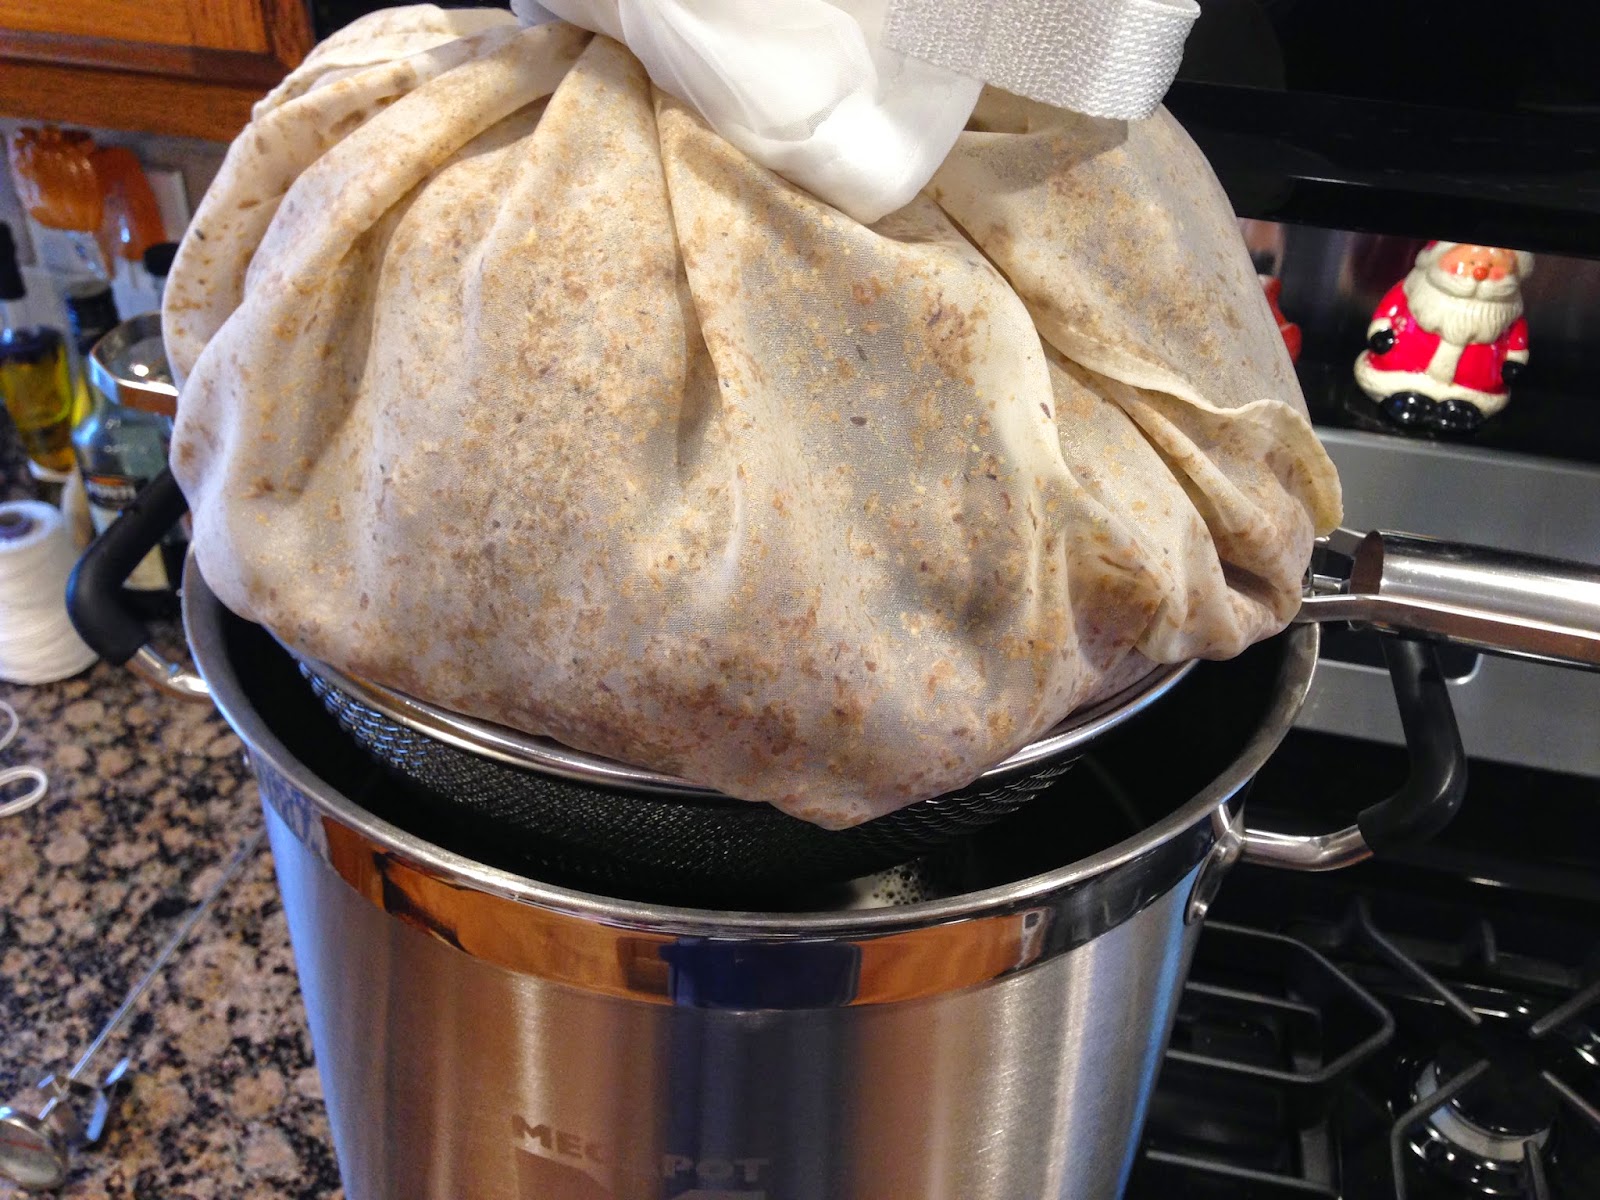
The biggest test for our BIAB setup came at the end of the mash. Last time we tried BIAB, we didn't have a good strainer and the bag spilled a bunch of liquid over the sides of the pot onto the stove while it drained. This time, I got on a step-stool above the pot so I could lift the bag way up. The handles on the brew bag made it really easy to pull the bag up, despite the weight of the grains and all the water. I lifted it up and Amy put our new 12" strainer underneath. We let the bag drain while we brought the wort up to a boil and measured our ingredients. That whole part of the process was a million times better than our previous BIAB attempt.

After the mash, our pre-boil volume was somewhere between 5.25 and 5.5 gallons, which was a little higher than we were shooting for but we're still getting a handle on how much water we lose from getting soaked up by the grains. After the 90 minute boil, we were down to a bit over 4 gallons. That allowed us to put a little over 3.4 gallons in the primary and still end up with nearly 10 cups left over in the kettle.

We got a hydrometer reading of 1.088 and a refractometer measurement of 21.2 brix. A little lower than the 1.105 starting gravity we were shooting for, but I'm sure a big part of that is us still figuring out the efficiency and water levels for our BIAB setup. After a few more batches and rounds of adjusting the numbers in BeerSmith, we should get pretty good at hitting our target gravity.

We didn't finish the brew day until close to 3 in the afternoon, but it was a great way to spend a day off. Overall our first all-grain with our new setup worked great though. It was fun doing a Belgian too. The Belgian yeast actually smelled good prior to pitching into the primary, which is quite a departure from some of the funky-smelling yeasts of other types. Unfortunately, the yeast (according to Beer Captured) is pretty temperature sensitive and needs to be around 70 F during fermentation. I'm not sure we have anywhere in the house that stays a consistent 70 F, so that part may be a trick. Beer Captured also says we should leave the beer in the secondary for 6 weeks, and in the bottle for another 6 weeks, so it'll be quite a while before we're tasting it. Hopefully it tastes good!


---> [ The Quad Of My Dreams Tasting ]

Sunday, December 14, 2014

Oatmeal Stout Bottling

A couple weeks ago Amy and I bottled the Barney Flats Oatmeal Stout clone that we brewed with my brother Craig. This was our first chance to try the beer after the "bourbon oak" from the secondary, so we were definitely excited to see how it was tasting.

The first step for bottling is to prep the corn sugar solution that will be used for carbonation. The range for oatmeal stouts is about 2 to 2.5 vols of carbonation, so we went with a target of 2.2. Using BeerSmith software, we calculated that out to 16g of corn sugar per gallon of beer. After mixing the corn sugar in with some water, we boiled it up in the microwave and then threw it in the freezer to cool it down so that the heat isn't hard on the yeast.

The next step is getting everything sanitized and putting all the bottles on a big "tree" where the sanitizer can drain from the bottles. After that was done we poured the corn sugar solution into the bottling bucket, then siphoned the beer from the secondary into the bottling bucket.

Once all that prep is done, it's time to bottle! Amy filled the bottles while I capped them and handed her more empty bottles. We got nine bottles out of the first carboy, then ten bottles out of the carboy with the bourbon oak, including one 22oz bomber.

We marked the bottles that had the bourbon oak with "B" to make sure we could keep track. Finally with all the bottling done comes the best part - tasting! The regular (non-bourbon) oatmeal stout tasted really good. Nice hint of roast and maltiness you'd expect from an oatmeal stout. The oatmeal stout that had the bourbon-soaked oak spiral definitely had a strong bourbon flavor with some oak. It'll be interesting to see if it mellows out at all while bottle conditioning. If you like your bourbon-aged beers very bourbon-forward and strong though, at the moment this beer has it in spades. Can't wait to crack open a bottle or two on Christmas Eve and see what everyone thinks and how Craig likes the beer he helped brew!


[ Oatmeal Stout Racking to Secondary ] <--- | ---> [ If This Is Too Good For You I've Got Some Crap ]

Christmas Miracle 2014 Tasting

Our Christmas beer, dubbed "Christmas Miracle 2014" has been ready to drink for a couple weeks now. The beer has good carbonation and all the target flavors are there - predominately cherry but also cinnamon and vanilla. With the 8% ABV and the strong cherry flavor, it certainly fits right in as a Christmas beer. Personally, I feel like the cherry may be a bit overpowering for me, resulting in an almost cough-syrupy beer. Amy is a fan though, and certainly it does taste like a decently-made beer and doesn't really have any off flavors.

Every year our friends Steve and Valerie host a holiday beer tasting, where everyone brings a couple beers hidden in bags, and we do blind tastings of all the beers to see what we think. One of the beers we brought this year was our Christmas Miracle home brew. Nobody knew there was a home brew in the mix, and with the blind tasting people likened it to some of the other cherry-based holiday beers. People who liked that flavor liked the beer, and the fact that nobody even suspected the beer was a home brew was....... a Christmas Miracle!!!!

[ 2014 Xmas Beer Racking ] <---

Saturday, November 22, 2014

Oatmeal Stout Racking to Secondary

This morning we racked the oatmeal stout into the two 1-gallon carboys. There didn't seem to be much activity in the airlock after the first few days, so I was nervous about what we'd find when we opened up the primary. Good sign #1: a nice rim of gunk above the beer, showing that the krausen was there at one point and had fallen back into the beer - both good things.

Before racking, we took the oak spiral that had been soaking in bourbon for the last week and dropped it into one of the carboys. When we first put the oak in the bourbon, it floated on top. By now, it was fully submerged in the bourbon so it must have really soaked up a lot!

Siphoning the beer into the secondaries was nice and straight forward. We had enough to fill both carboys and had a little left over to try a sample. It seems to be tasting nice so far. My brother wasn't here to rack with us, but we bottled a little bit of the leftover beer so he can try it when he's down for Thanksgiving.

Good sign #2 for the beer: the refractometer reading was 8.25 brix (equating to 1.017 specific gravity), down from 15 brix on brew day. That equates to an ABV of 5.4%. Right on target! I was worried with so little bubbling in the airlock that we'd have low attenuation, so it was a relief seeing the gravity drop to the right level.

If the beer sits for just shy of a couple weeks in the secondary, then we can bottle exactly three weeks prior to Christmas. Hopefully we'll have a carbonated tasty beer when we all get together for Christmas. Looking forward to seeing how it turns out!


[ Barney Flats Oatmeal Stout Brew Day ] <--- | ---> [ Oatmeal Stout Bottling ]

Sunday, November 16, 2014

Barney Flats Oatmeal Stout Brew Day

Saturday I got to brew a beer with my brother for the first time! He had never brewed beer before, so last time he was down he checked out our books of clone recipes and landed on Barney Flats Oatmeal Stout by Anderson Valley Brewing Company. The recipe is in North American Clone Brews.

Craig was on a limited time schedule and ran into traffic on the way down from New York, so he missed the start of the brew day. The only thing he missed was putting the specialty grains in the 150 degree water to steep them for 45 minutes. He arrived in time to help pull out the grain bag, add the DME, and start bringing the wort up to a boil.

It was a pretty standard brew day. Just two hop additions (90 mins and 15 mins) and compared to the Xmas Beer and Pumqueen we made lately, it seemed really straightforward. We brewed a 2-gallon batch, and between the smaller amount of liquid and the colder water from the tap, the wort chiller worked nice and fast. The one very minor hiccup was that the 90 minute boil time resulted in more boil-off than our usual 60-minute boil. We had enough to reach the target batch size, but not enough extra to actually get a taste. Good thing we have the refractometer to get a gravity reading with only a few drops! We came it at 1.060 OG, with is actually a few points higher than we planned, but that's never a bad thing.

Since we're only doing a 2-gallon batch, we'll be putting it into two 1-gallon carboys for secondary fermentation. For one of the carboys, we're going to try a "bourbon barrel" flavor. We bought a medium toasted oak spiral (like a column with lots of surface area) and put it in Knob Creek bourbon to soak for the next week. When we rack to the secondaries, we'll put the bourbon oak spiral in one of them. I can't wait to compare the two side by side to compare the effect of bourbon-soaked oak.

If we give one week for the primary and two weeks for the secondary, then that only leaves 2.5 weeks in the bottle before we're all together again at Christmas. Hopefully the beer is carbonated by then, but it could easily be another week or two (or more!) before the beer is really coming into its prime. I'm still not sure if we should just go with that or if we should try to compress the primary and secondary schedules a little bit in order to have longer in the bottle by Christmas.

It was really fun doing a beer with my brother. It's too bad that the schedule for racking and bottling won't line up with him being in town again, but hopefully just over a month from now we're enjoying a delicious oatmeal stout together that we brewed ourselves!


---> [ Oatmeal Stout Racking to Secondary ]

Pumqueen Tasting

After nearly 5 weeks in the bottle, we tasted our Southern Tier Pumking clone (dubbed Pumqueen) at the end of October. It definitely has some good pumpkin spice flavors and a buttery taste reminiscent of Pumking. It's lacking a little bit of the alcohol bite of Pumking due to the lower ABV. Also, in my opinion, there's a tiny bit of an apple-like off flavor, but Amy disagrees. The Untappd check-ins from the few people who have tried it have varied from 2.5 to 4 stars (out of 5), so I guess some people think it's pretty tasty. All in all, it's not a bad first pumpkin beer for us. It was certainly fun to brew with how involved it was - the roasting pumpkin, creating our own spice extract, etc. And ending up with a pumpkin-flavored drinkable result makes it that much more fun.

[ Pumking Bottling ] <---