Friday, December 26, 2014

Westvleteren Abt 12 Brew Day

With all the time we had off work for Christmas this year, we decided to spend a day brewing another beer. This was our first time brewing with our new 8-gallon MegaPot and BIAB bag (from bagbrewer.com). This was only our second all-grain batch, but we went big with Westvleteren Abt 12 from Beer Captured - a 10% ABV Belgian strong dark ale that involved over 12 pounds of grain.

We started the brew day at about 10:00 am with a 90 minute mash. We were shooting for a mash temperature of 150 F and had the water up to the strike temperature, but it took us a little bit to figure out the best way to hold the edge of the brew bag around the lip of the pot. We were also worried that the 6.25 gallons of water wouldn't fit in the pot with all that grain, so we started with only 5 gallons in the pot. It turned out all 6.25 gallons did fit, so that was a plus. By the time we got the grains in and all the water, the mash temperature ended up being in the mid 140s. I'm not sure if it's from the strike water being too low, or the added water being too cool, or the time it took to get the bag setup figured out.

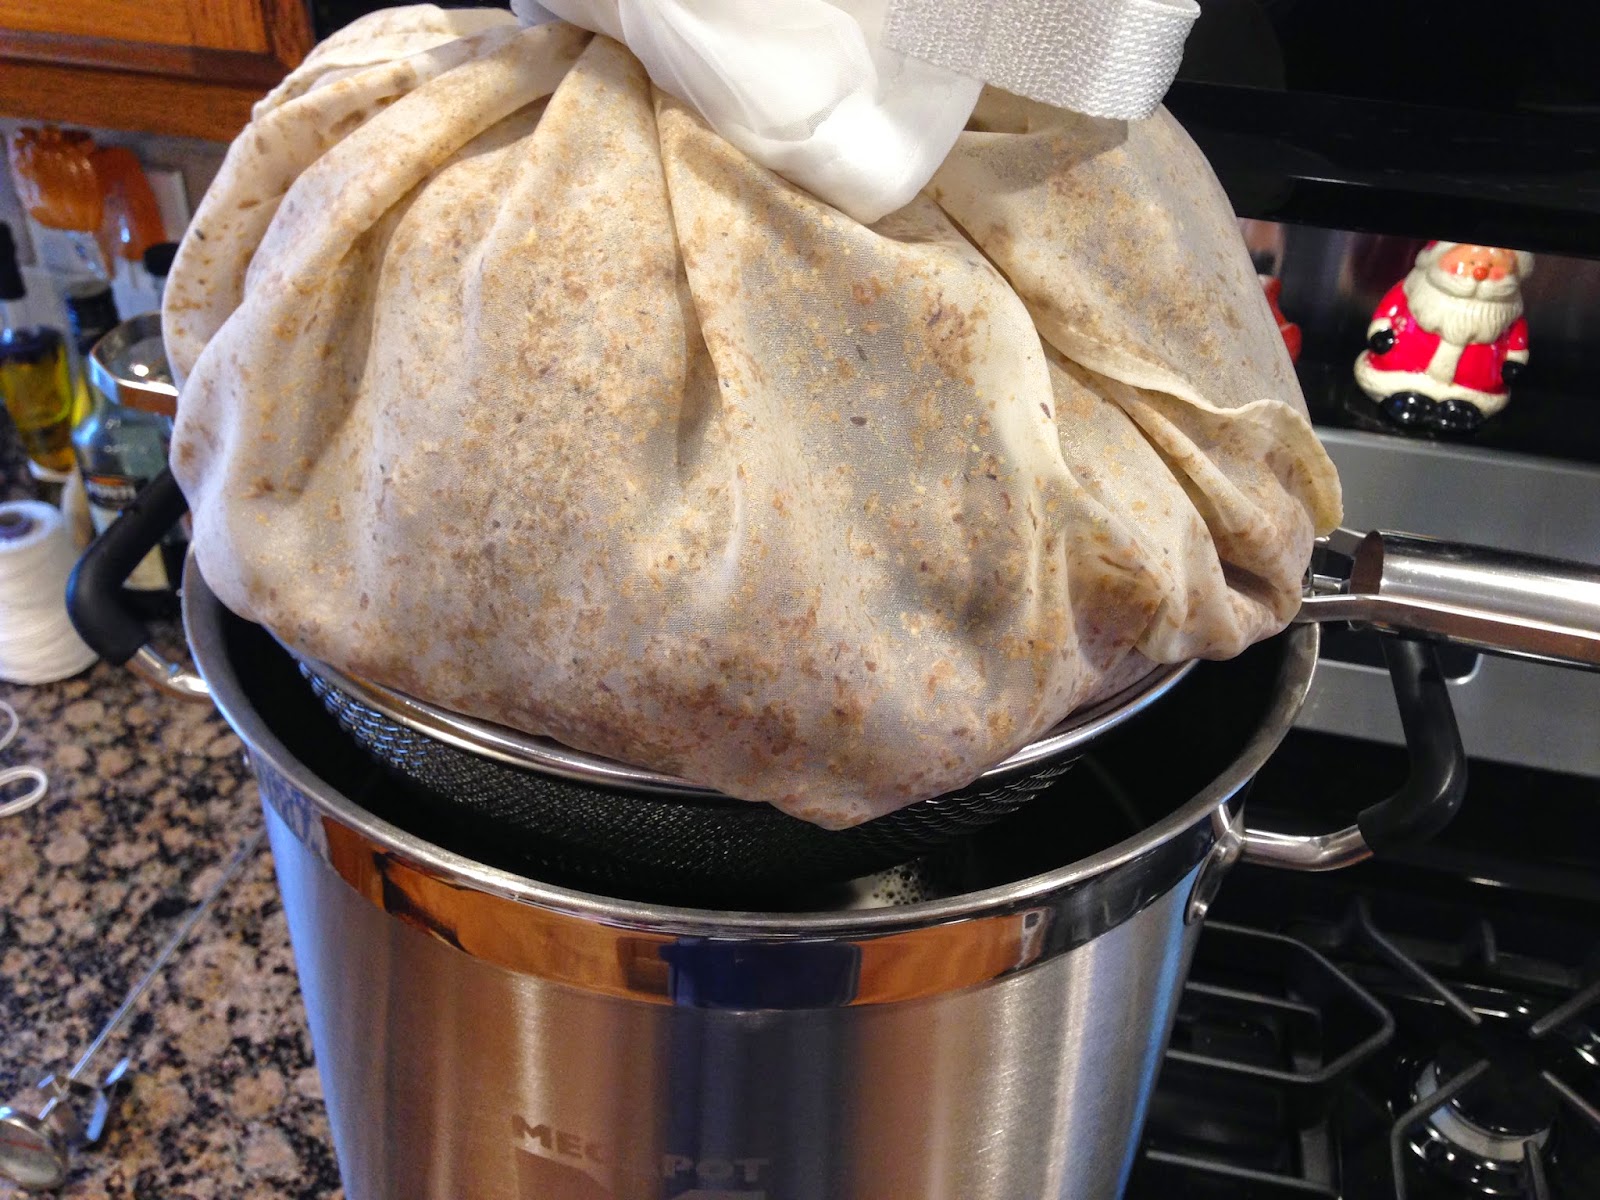
The biggest test for our BIAB setup came at the end of the mash. Last time we tried BIAB, we didn't have a good strainer and the bag spilled a bunch of liquid over the sides of the pot onto the stove while it drained. This time, I got on a step-stool above the pot so I could lift the bag way up. The handles on the brew bag made it really easy to pull the bag up, despite the weight of the grains and all the water. I lifted it up and Amy put our new 12" strainer underneath. We let the bag drain while we brought the wort up to a boil and measured our ingredients. That whole part of the process was a million times better than our previous BIAB attempt.

After the mash, our pre-boil volume was somewhere between 5.25 and 5.5 gallons, which was a little higher than we were shooting for but we're still getting a handle on how much water we lose from getting soaked up by the grains. After the 90 minute boil, we were down to a bit over 4 gallons. That allowed us to put a little over 3.4 gallons in the primary and still end up with nearly 10 cups left over in the kettle.

We got a hydrometer reading of 1.088 and a refractometer measurement of 21.2 brix. A little lower than the 1.105 starting gravity we were shooting for, but I'm sure a big part of that is us still figuring out the efficiency and water levels for our BIAB setup. After a few more batches and rounds of adjusting the numbers in BeerSmith, we should get pretty good at hitting our target gravity.

We didn't finish the brew day until close to 3 in the afternoon, but it was a great way to spend a day off. Overall our first all-grain with our new setup worked great though. It was fun doing a Belgian too. The Belgian yeast actually smelled good prior to pitching into the primary, which is quite a departure from some of the funky-smelling yeasts of other types. Unfortunately, the yeast (according to Beer Captured) is pretty temperature sensitive and needs to be around 70 F during fermentation. I'm not sure we have anywhere in the house that stays a consistent 70 F, so that part may be a trick. Beer Captured also says we should leave the beer in the secondary for 6 weeks, and in the bottle for another 6 weeks, so it'll be quite a while before we're tasting it. Hopefully it tastes good!


---> [ The Quad Of My Dreams Tasting ]

Sunday, December 14, 2014

Oatmeal Stout Bottling

A couple weeks ago Amy and I bottled the Barney Flats Oatmeal Stout clone that we brewed with my brother Craig. This was our first chance to try the beer after the "bourbon oak" from the secondary, so we were definitely excited to see how it was tasting.

The first step for bottling is to prep the corn sugar solution that will be used for carbonation. The range for oatmeal stouts is about 2 to 2.5 vols of carbonation, so we went with a target of 2.2. Using BeerSmith software, we calculated that out to 16g of corn sugar per gallon of beer. After mixing the corn sugar in with some water, we boiled it up in the microwave and then threw it in the freezer to cool it down so that the heat isn't hard on the yeast.

The next step is getting everything sanitized and putting all the bottles on a big "tree" where the sanitizer can drain from the bottles. After that was done we poured the corn sugar solution into the bottling bucket, then siphoned the beer from the secondary into the bottling bucket.

Once all that prep is done, it's time to bottle! Amy filled the bottles while I capped them and handed her more empty bottles. We got nine bottles out of the first carboy, then ten bottles out of the carboy with the bourbon oak, including one 22oz bomber.

We marked the bottles that had the bourbon oak with "B" to make sure we could keep track. Finally with all the bottling done comes the best part - tasting! The regular (non-bourbon) oatmeal stout tasted really good. Nice hint of roast and maltiness you'd expect from an oatmeal stout. The oatmeal stout that had the bourbon-soaked oak spiral definitely had a strong bourbon flavor with some oak. It'll be interesting to see if it mellows out at all while bottle conditioning. If you like your bourbon-aged beers very bourbon-forward and strong though, at the moment this beer has it in spades. Can't wait to crack open a bottle or two on Christmas Eve and see what everyone thinks and how Craig likes the beer he helped brew!


[ Oatmeal Stout Racking to Secondary ] <--- | ---> [ If This Is Too Good For You I've Got Some Crap ]

Christmas Miracle 2014 Tasting

Our Christmas beer, dubbed "Christmas Miracle 2014" has been ready to drink for a couple weeks now. The beer has good carbonation and all the target flavors are there - predominately cherry but also cinnamon and vanilla. With the 8% ABV and the strong cherry flavor, it certainly fits right in as a Christmas beer. Personally, I feel like the cherry may be a bit overpowering for me, resulting in an almost cough-syrupy beer. Amy is a fan though, and certainly it does taste like a decently-made beer and doesn't really have any off flavors.

Every year our friends Steve and Valerie host a holiday beer tasting, where everyone brings a couple beers hidden in bags, and we do blind tastings of all the beers to see what we think. One of the beers we brought this year was our Christmas Miracle home brew. Nobody knew there was a home brew in the mix, and with the blind tasting people likened it to some of the other cherry-based holiday beers. People who liked that flavor liked the beer, and the fact that nobody even suspected the beer was a home brew was....... a Christmas Miracle!!!!

[ 2014 Xmas Beer Racking ] <---

Saturday, November 22, 2014

Oatmeal Stout Racking to Secondary

This morning we racked the oatmeal stout into the two 1-gallon carboys. There didn't seem to be much activity in the airlock after the first few days, so I was nervous about what we'd find when we opened up the primary. Good sign #1: a nice rim of gunk above the beer, showing that the krausen was there at one point and had fallen back into the beer - both good things.

Before racking, we took the oak spiral that had been soaking in bourbon for the last week and dropped it into one of the carboys. When we first put the oak in the bourbon, it floated on top. By now, it was fully submerged in the bourbon so it must have really soaked up a lot!

Siphoning the beer into the secondaries was nice and straight forward. We had enough to fill both carboys and had a little left over to try a sample. It seems to be tasting nice so far. My brother wasn't here to rack with us, but we bottled a little bit of the leftover beer so he can try it when he's down for Thanksgiving.

Good sign #2 for the beer: the refractometer reading was 8.25 brix (equating to 1.017 specific gravity), down from 15 brix on brew day. That equates to an ABV of 5.4%. Right on target! I was worried with so little bubbling in the airlock that we'd have low attenuation, so it was a relief seeing the gravity drop to the right level.

If the beer sits for just shy of a couple weeks in the secondary, then we can bottle exactly three weeks prior to Christmas. Hopefully we'll have a carbonated tasty beer when we all get together for Christmas. Looking forward to seeing how it turns out!


[ Barney Flats Oatmeal Stout Brew Day ] <--- | ---> [ Oatmeal Stout Bottling ]

Sunday, November 16, 2014

Barney Flats Oatmeal Stout Brew Day

Saturday I got to brew a beer with my brother for the first time! He had never brewed beer before, so last time he was down he checked out our books of clone recipes and landed on Barney Flats Oatmeal Stout by Anderson Valley Brewing Company. The recipe is in North American Clone Brews.

Craig was on a limited time schedule and ran into traffic on the way down from New York, so he missed the start of the brew day. The only thing he missed was putting the specialty grains in the 150 degree water to steep them for 45 minutes. He arrived in time to help pull out the grain bag, add the DME, and start bringing the wort up to a boil.

It was a pretty standard brew day. Just two hop additions (90 mins and 15 mins) and compared to the Xmas Beer and Pumqueen we made lately, it seemed really straightforward. We brewed a 2-gallon batch, and between the smaller amount of liquid and the colder water from the tap, the wort chiller worked nice and fast. The one very minor hiccup was that the 90 minute boil time resulted in more boil-off than our usual 60-minute boil. We had enough to reach the target batch size, but not enough extra to actually get a taste. Good thing we have the refractometer to get a gravity reading with only a few drops! We came it at 1.060 OG, with is actually a few points higher than we planned, but that's never a bad thing.

Since we're only doing a 2-gallon batch, we'll be putting it into two 1-gallon carboys for secondary fermentation. For one of the carboys, we're going to try a "bourbon barrel" flavor. We bought a medium toasted oak spiral (like a column with lots of surface area) and put it in Knob Creek bourbon to soak for the next week. When we rack to the secondaries, we'll put the bourbon oak spiral in one of them. I can't wait to compare the two side by side to compare the effect of bourbon-soaked oak.

If we give one week for the primary and two weeks for the secondary, then that only leaves 2.5 weeks in the bottle before we're all together again at Christmas. Hopefully the beer is carbonated by then, but it could easily be another week or two (or more!) before the beer is really coming into its prime. I'm still not sure if we should just go with that or if we should try to compress the primary and secondary schedules a little bit in order to have longer in the bottle by Christmas.

It was really fun doing a beer with my brother. It's too bad that the schedule for racking and bottling won't line up with him being in town again, but hopefully just over a month from now we're enjoying a delicious oatmeal stout together that we brewed ourselves!


---> [ Oatmeal Stout Racking to Secondary ]

Pumqueen Tasting

After nearly 5 weeks in the bottle, we tasted our Southern Tier Pumking clone (dubbed Pumqueen) at the end of October. It definitely has some good pumpkin spice flavors and a buttery taste reminiscent of Pumking. It's lacking a little bit of the alcohol bite of Pumking due to the lower ABV. Also, in my opinion, there's a tiny bit of an apple-like off flavor, but Amy disagrees. The Untappd check-ins from the few people who have tried it have varied from 2.5 to 4 stars (out of 5), so I guess some people think it's pretty tasty. All in all, it's not a bad first pumpkin beer for us. It was certainly fun to brew with how involved it was - the roasting pumpkin, creating our own spice extract, etc. And ending up with a pumpkin-flavored drinkable result makes it that much more fun.

[ Pumking Bottling ] <---

Monday, October 20, 2014

2014 Xmas Beer Racking

Tonight we racked our Christmas beer and got our first chance to see how it's progressing. It was a smooth home brew night - no stuck stoppers or broken carboys at all! The only minor glitch was that we almost forgot to put in the cinnamon sticks and vanilla bean to "dry spice" the secondary. Amy saved the day by remembering!

We got to use our refractometer again to measure the brix, and with some handy calculations and conversions with BeerSmith, it looks like we're at a gravity of 1.026 for an ABV of 8.1%. This was a relief since I was worried the fluctuations in temperature during primary fermentation would cause some problems. If they are, they don't seem to be showing in the form of reduced attenuation. I guess it still remains to be seen if the temperature changes produce any off flavors in the finished beer.

So far the beer tastes pretty good. You can taste the cherries but they're not overpowering. We're excited to see what it tastes like with the cinnamon and vanilla in there.


[ 2014 Christmas Beer Brew Day ] <--- | ---> [ Christmas Miracle 2014 Tasting ]

Monday, October 13, 2014

2014 Christmas Beer Brew Day

On Friday we brewed our first Christmas beer! With about seven weeks until Thanksgiving and the start of the holiday season, we definitely had to get it brewed so that it will be ready in time to enjoy during the holidays. It's been since the start of September since we brewed a beer, and it was great getting back into it.

The beer we chose for our first Christmas beer is "Bad Santa" from https://byo.com/stories/item/2258-winter-seasonal-beers. It has cherries, vanilla, cinnamon, and an 8%+ ABV. We achieved a little brewing milestone with this beer - our first trip to the home brew store where we only bought ingredients!

The brewing was a pretty straightforward extract beer with specialty grains. The one interesting step in the recipe was taking out some of the wort and soaking the dried cherries, then adding that liquid back in at the end of the boil.

This brew day was also the first time we got to try our new wort chiller from Northern Brewer. It did cool the beer a lot quicker than an ice bath would have, especially for a batch as big as three gallons. It still seemed to take a while though. I'm wondering if it would cool even faster if we ran the water piping through an ice bath before it reached the wort chiller to really get it super cooled though. Maybe time to invest in a second wort chiller and then run the two in series.

We used an Irish Ale yeast according to the recipe, but the recipe calls for a 62-64 degree fermentation temperature which we've had a little bit of a hard time hitting. We've been keeping the fermenting beer in the laundry room with the vents and door closed, then opening the outside door as needed to drop the temperature down. It's staying relatively cool but I have a bad feeling the temperature fluctuations are more than what the yeast would like.

If everything goes well, hopefully our first Christmas beer will be ready in late November. Can't wait to see how it turns out!


Tuesday, October 7, 2014

Black Mo Tasting

We bottled our Tumbler clone over a month ago and it's finally ready to drink! We tried it a couple weeks after bottling, but (frustratingly) it still wasn't carbonated yet. Since then though, we finally got carbonation. Plus, the smokiness mellowed out a lot just in the last couple weeks.

We may be biased since it's our beer, but I think this one really is genuinely tasty. It's got some brown maltiness, noticeable smoke presence, and a hint of chocolate. We have a couple bottles of Sierra Nevada Tumbler from a "fall sampler pack," so I'm looking forward to a side-by-side comparison just to see how close our beer is to Tumbler. I'm so glad we made three gallons of it, so we have lots of bottles to enjoy and share.

The name is a reference to Black Moshannon State Park in Pennsylvania, where Amy's family loves to camp and has had several family reunions. What better name for our smokey dark beer?


Sunday, October 5, 2014

Bug Juice Tasting - Part 2

Paul's brother was in town this weekend for the Orioles game, so we decided to try a few of the home brews. We tried the Bug Juice dunkelweizen first. The last time we tried it, it was carbonated but still pretty rough around the edges taste-wise. I was hoping the taste would improve with more time, as the yeast cleans up the byproducts of fermenting the priming sugar.

As it turns out, the last two weeks in the bottle actually did help! The harshness and acidity from the last tasting seems to have gone away. The result is a nice dunkelweizen - some caramel malty sweetness and plenty of banana notes from the yeast. We're finally ending up with some home brewed beers that are enjoyable to drink!

Tuesday, September 23, 2014

Pumking Bottling

Tonight we bottled our Pumking clone and got a little glimpse of how the taste is progressing with all the stuff we added in the secondary. Start to finish, the whole bottling only took an hour which is great. This is our first time bottling with bombers too - from our two gallon batch we ended up with five 22oz bombers and 11 regular bottles.

In order to get a final gravity reading, we siphoned a little bit of the beer off to a cup before it hit the bottling bucket. That way the gravity reading isn't affected by the priming sugar. Reading came out to 1.015, which means we didn't get any extra points during secondary fermentation.

The taste was pretty good so far. It's not quite as strong as Southern Tier Pumking, which may get back to getting less malt into the wort than we intended. But, I think you can actually tell that it's Pumking we were shooting for. If the same holds true for the final beer, we'll consider it a success.


[ Pumking Racking ] <--- | ---> [ Pumqueen Tasting ]

Monday, September 22, 2014

Bug Juice Tasting

It's been just over two weeks since we bottled our "Bug Juice" dunkelweizen. Having our brewing buddies over again was the perfect excuse to crack open a couple bottles and see how they're doing. As soon as we broke the seal on the bottle cap, it was a good sign - that characteristic psshhh of a carbonated bottle. Then with the pour, plenty of foamy head! We finally produced a carbonated beer!

We've had very little carbonation in our El Jefe or Tumbler Clone after a month or more of bottle conditioning, and after just two weeks we have great carbonation with Bug Juice. The best theory we can come up with so far is that the krausen hadn't fallen with the first two beers when we racked, but it had with Bug Juice. Maybe with the krausen not fallen yet, we lost a lot of yeast when we racked to the secondary with those first two beers. Luckily the krausen had fallen with the pumking clone, so there's hope we'll get good carbonation from that beer too.

As for the taste - it was a little on the sweet side and maybe slightly acidic. Not great, but certainly drinkable. I'm thinking another week or two in the bottle might round out some of the rough edges. We're still making steps in the right direction with our home brewing though, and hopefully we have better and better beers ahead of us.

Oh, and the Bug Juice name? Well, if you don't know, you'll just have to poke around the blog until you figure it out! :-)

Thursday, September 11, 2014

Pumking Racking

Monday night we racked our Pumking clone and got our first taste of how it's going. This is our first beer where the recipe calls for adding ingredients to the secondary. One of the ingredients was a spice extract we made ourselves with vodka and a mix of spices. Apparently we should have used more vodka, because there was very little liquid sitting atop a bunch of spice sludge. Measuring the right amounts was already a little hard because we had to divide all the ingredients between the two carboys. The spice sludge just made measuring the amounts that much harder.

After we got the ingredients added to the carboys, the rest of racking went very well. We ended up with two cups of liquid left over after filling the carboys, so the 2.4 gallon batch volume seems to be just about right. I feel like we're gradually getting the beersmith settings dialed in.

The gravity after primary fermentation is down to 1.015, which puts us at about 6.2% ABV. It's less than our original target of over 8%, but I think that's mostly because of the boil volumes and all the sugars that ended up all over our stove. :-) Considering this was our first attempt at mashing, just the fact that we produced enough fermentable sugars in the mash to get from 1.062 down to 1.015 is a success.

The taste at this stage had a mild pumpkin and spice flavor to it. With all the great-smelling things we added to the secondary, it seems like it could really come out well.


[ Pumking Clone Brew Day ] <--- | ---> [ Pumking Bottling ]

Wednesday, September 10, 2014

Dunkelweizen Bottling

Friday we bottled the dunkelweizen with our brewing buddies over to help. It was certainly a lot easier with the extra hands there. We ended up with ten bottles total from our gallon of beer. The sweaty sock smell we noticed while racking from the primary seems to be gone. It really tasted like it could be good once it's cold and has some carbonation.

That night we also cracked open one of the tumbler clone bottles to see how it was doing. Very slightly carbonated, but so far it seems to be tasting good and hopefully it'll get a lot more carbonation over the next two or three weeks.


[ Dunkelweizen Racking ] <--- | ---> [ Bug Juice Tasting ]

Tuesday, September 9, 2014

El Jefe Tasting - Part 2

It's been two weeks since our failed tasting of the El Jefe hefeweizen. Since then, we moved the bottles up from the basement to the first floor where it's a couple degrees warmer. We also took each of the few remaining hefeweizen bottles and turned them upside down to mix up the sugar sitting on the bottom.

The result: we finally have some carbonation! Not a ton, but definitely more than the flat beer of two weeks ago. The sugary sweetness from two weeks ago was also pretty much gone and the result was actually a pretty drinkable beer. I'm not sure if any of the things we did fixed the problem, or if it was simply a matter of waiting longer for the yeast to get to work. Either way, it's exciting that our first batch of home brew produced something drinkable. :-)

[ El Jefe Tasting ] <---

Monday, September 1, 2014

Pumking Clone Brew Day

Today we did our first all-grain brew, which we did using the Brew in a Bag (BIAB) method of all-grain. We're shooting for a 2-gallon batch of Pumking clone using the recipe we found at Pedal To The Kettle. As expected, lots of lessons learned from our first time with the technique.

The first issue we encountered was with the volume of water for the mash. Given evaporation, boil off, and grains soaking up water, the ideal starting water for our batch would have been about 4 gallons. But, with just a 5-gallon kettle and 6+ lbs of grain to fit in, we decided to just go with 3 gallons of water for the mash instead. If we want to do full volume mashing for even just a 2 gallon batch, we're going to need something bigger than a 5 gallon kettle.

Temperature-wise, the mash seemed to go just fine. We started with water at 160 and then, after adding room-temp grains, the mash started at 152. Even without any insulation for the kettle, the mash only dropped down to about 149 over the course of an hour. We could have added a little more heat to keep it in the 150s, but I think 149 should be just fine for starch conversion.

The hardest part of the day was lautering with the brew bag. When we pulled the bag out of the kettle it felt like we were pulling all of the liquid out with it. We tried setting it in a colander to let the water drain out, but the bag with all the grains was so wide that wort started spilling out over the sides, making a mess of the stove top. We ended up taking a huge bowl, wider than the kettle, and setting the bag in that to let it drain. Amy also squeezed the bag to get more of the liquid out, but with all the hot water in there, that wasn't easy either. In the end, we got to a little over 2.5 gallons of wort from the mash. Not a ton of water loss but it took a lot of work to get there. In the future we need some sort of strainer solution that makes it a lot easier to drain the water out of the bag.

To get to our 3.5 gallon pre-boil volume, we added almost a gallon of water to the kettle after mashing. In retrospect, we should have sparged this water through the grains to get some more of the sugar.

The rest of the brew day was pretty straightforward. The only issue we ran into was having enough wort to reach our 2.4 gallon batch volume and still have enough left for a gravity reading. The 5 cups left over in the kettle was all trub, so we ended up pulling wort from the primary, doing the reading, then dumping it back into the primary. Next time I need to calculate in more than 0.3 gallons for trub loss so that we have more wort to play with when transferring to primary.

The original gravity came out to 1.062 - way below our target of 1.080. It looks like we have some work to do on our BIAB efficiency. One thing we could have done was sparge the added water through the grains to get some more sugar. We also could have done a finer crush on the grains - perhaps by having the brew store double-mill the grains if they can't just configure the mill differently. Another little thing we could do is use a mash pH stabilizer to increase efficiency.

So the two big issues of the day were draining the brew bag (lautering) and brew efficiency. Hopefully we can get those worked out for future BIAB brews. I still think the technique could work out well and give us all the advantages of all-grain without adding all that much time to the brew day compared to extract brewing. And hopefully despite the issues, we still end up with a tasty pumpkin beer in a month or so.

---> [ Pumking Racking ]

Monday, August 25, 2014

Tumbler Bottling

After our failed El Jefe tasting and the dunkel racking snafu, it was great to have a smooth and successful home brew night with bottling our Tumbler clone.

As part of troubleshooting the lack of carbonation in the hefeweizen, we went with corn sugar this time. In order to mix the priming sugar with the beer, we put the priming sugar solution into a bottling bucket, then siphoned the beer from the secondary into the bucket. This also made the bottling itself easier than using the siphon straight from the secondary. We ended up with 28 bottles of beer, but we probably could have gotten 29 or 30. I wonder if the 3-gallon carboy actually holds a bit more than 3-gallons.

The final gravity ended up at 1.016, which should put the ABV at about 5.8%. The taste was still nicely smokey and chocolaty. I'm not sure it's much of a clone of Tumbler, but as long as the final beer tastes good then that's all that matters. Can't wait to taste it with the carbonation! We also still need a fun name for it, but I'm sure Amy is working on it.


Friday, August 22, 2014

Dunkelweizen Racking

Since our dunkelweizen brewing buddies were here for the El Jefe tasting, we decided to rack the dunkel to the secondary fermenter. When we took the lid off the primary fermenter, there was a slightly funky smell. The hope is the yeast will take care of the funk. We made a two gallon batch and since they don't make 2 gallon carboys, we racked it into two one gallon carboys. Racking should have been an easy process, but I didn't know my own strength. After the beer was put into the carboys, I was putting the airlock in one of the stoppers and I pushed too far. The stopper ended up in the neck of the carboy. Then, in the process of trying to rescue the stopper, the glass on the carboy broke. So, we decided to call it a loss. Lessons were learned. At least we had made two gallons and one gallon is still going strong. The hydrometer reading was 1.017 so the current ABV is 4.7% before going into the secondary. Hopefully the gravity will still drop a few points by the end of secondary fermentation.


[ Dunkelweizen Brew Day ] <--- | ---> [ Dunkelweizen Bottling ]

El Jefe Tasting

We finally got to taste our first batch of home brew! We had family over and expanded the tasting with more family using Google Hangouts. Lots of fun was had by all. El Jefe had one fatal flaw: no carbination. Overall the beer tasted good, but it was a little sweeter than it should have been. It seems the yeast didn't process the priming sugar to produce CO2, leading to a slightly sweet, flat beer. So, we have some debugging to do. Thankfully we haven't bottled any other brews, so we have a chance to get it right with the Tumbler clone. There's a possibility that the yeast just stalled out and some more time conditioning in the bottle will produce better results. Hopefully if we do El Jefe again, it will come out perfectly.

[ Hefeweizen Rack to Secondary ] <--- | ---> [ El Jefe Tasting - Part 2 ]

Sunday, August 17, 2014

Dunkelweizen Brew Day

With the hefeweizen almost ready to drink and the Tumbler sitting patiently in the secondary, we brewed our third batch of home brew - a clone of Weihenstephaner's outstanding dunkelweizen. We decided to go for a two gallon batch size this time. Unfortunately they don't make two gallon glass carboys, so it meant buying a second one gallon carboy and the secondary fermentation will just be split between the two carboys. I saw someone at the home brew store with a rewards card, so I asked about it and signed up. If only they had told me about it from the start, I would have already racked up some $10 off coupons!

The dunkelweizen brew day was easily the most fun of the three so far. For starters, it was our first Friday brew day, so there was less of a time crunch since we didn't have to wake up at 4 the next day. And, we had family over for dinner and beer beforehand, and to hang out and help with the whole brewing process!

We started the brew day with steeping the specialty grains at 150 for 30 minutes. While we were waiting for the water to come up to temperature, I noticed a few bugs walking around the grain steeping bag. I think they must have come from the grains we got from the home brew store! I got rid of the few bugs I saw, and couldn't find any more in the grains. I'm not sure if there were more in there, but at the very least the grain wasn't teeming with them. Nobody else seemed concerned, so into the water it went.

While the grains were steeping in about a gallon of water, I realized that we didn't measure out and mark the target pre-boil volume of 3.5 gallons. We had to just eyeball it between the 3 and 4 gallon marks on the kettle.

At the end of the steep, we poured a gallon of hot water through the grain bag to get the last bits of sugar, then added the extract and boiling water to get up to the pre-boil volume. Between the hotter water and the smaller batch size, it definitely came up to boil quicker than the last batch.

After 60 minutes we were only down to about 3 gallons instead of the 2.78 we were shooting for. I think we didn't have a vigorous enough boil and then fell short of our estimated boil-off rate. During the boil I had to run out and get two big bags of ice. Remembering to get the ice for each batch is a pain, plus cooling with the ice bath takes a solid 20+ minutes, so I'm wondering if it won't be long before we spring for a wort chiller of some kind.

After cooling and then siphoning to the fermenter, we had a trub loss of 0.4 Gal (more than the 0.3 we estimated) and still came in comfortably over our target batch size of 2.37 Gal. The gravity reading of 1.052 was a little less than the 1.056 we were shooting for, presumably because of the extra water.

The dunkelweizen has now been in the primary for a little over a day, and the airlock is bubbling like crazy. I'm hoping the timing works out that we can rack to the secondary on the same day that we taste the hefeweizen. Our dunkel brewing helpers will be over to taste the hefe and I'm sure they'd have fun participating in the next step of the dunkel as well.

Weihenstephaner Dark/Dunkelweizen clone attempt recipe:
Batch size: 2.37 Gal
OG: 1.056
FG: 1.014
ABV: 5.52%
IBUs: 14.0
Color: 19.4 SRM
0.48 lbs Caramel/Crystal 60 malt
0.36 lbs Honey malt
0.30 lbs Special B malt
2.82 lbs Wheat dry extract
13.4 g Hallertauer hops (4.1% alpha acid) @ 60 mins
0.4 tsp  irish moss @ 15 mins
Wyeast Weihenstephan yeast #3068

---> [ Dunkelweizen Racking ]

Thursday, August 7, 2014

Tumbler Clone Brew Day

For our second home brew, we decided to try for a clone of one of my favorite fall beers - Sierra Nevada Tumbler. It's got a nice malty slightly smokey flavor, and apparently Sierra Nevada isn't brewing it any more. We're doing a three gallon batch this time, mostly to act as a test run for a Christmas beer, which we're also planning for three gallons. Our first beer is still in the secondary, and we don't really have a ton of time between our two trips out of town, but we're fitting in brewing and racking the Tumbler plus bottling the hefeweizen before we head out of town again.

The trip to the brew store was mostly just ingredients this time, but we did pick up a 3 gallon carboy, an airlock, thermometer, irish moss, and priming sugar. Another $100 trip at the home brew store. It'll be a nice little milestone when we brew a beer and actually only buy ingredients.

Brewing the Tumbler involved specialty grains, which we didn't use in the hefeweizen, so the first step was steeping the grains in 1.5 gallons of water at 150 degrees for a half hour. Next we pulled out the bag of grains, put it in a colander, and poured a gallon of water through to sparge. We put the dried malt extract in, stirred it up, then filled the pot to 4 gallons. So we used one of our lessons learned from last time to hit the pre-boil volume with the extract. But, another lesson learned - we should have made that additional water pretty hot first because it took forever to get that 4 gallons up to boiling. We also should have kept the lid on the kettle to get to boiling quicker.

At the end of the boil, we used our mixing spoon as kind of a dip stick to figure out the post-boil volume based on the depth of wort in the pot. It came out to 3.28 gallons for a boil-off rate of 0.72 gal/hour. We also measured the trub left over in the kettle after siphoning to the primary, which came to 4.75 cups. The volume left in the primary (2.98 gal??) was too low for the eventual rack to the secondary, so we added 4 cups of top-up water. Hopefully we now have enough to fill the 3 gallon carboy.

We took a bunch of measurements this time to help calibrate the settings in BeerSmith. Even with that, we got an original gravity of about 1.060 compared to BeerSmith's estimate of 1.051. I don't know if it's underestimating the sugars from steeping the grains, or the extract, or what. Next time I need to measure the gravity after steeping but before adding the extract to see if I can get a more accurate steeping efficiency and extract efficiency in the software. Still, even if our ABV is off by 0.5% or 1%, it's not the end of the world.

Tumbler clone attempt recipe (3 gal batch):
0.40 lbs Chocolate Malt
0.25 lbs Smoked Malt
0.65 lbs Crystal Malt 60 SRM
3.92 lbs Light Dry Extract
13.1 g Challenger hops @ 60 mins
13.1 g Challenger hops @ 15 mins
0.60 tsp Irish Moss @ 15 mins
13.1 g East Kent Goldings hops @ 10 mins
Wyeast American Ale yeast #1056

---> [ Tumbler Bottling ]

Wednesday, August 6, 2014

Hefeweizen Rack to Secondary

In the first couple days in the bucket, the beer foamed up enough that we had to clean and refill the airlock and wipe some beer off the top of the bucket. No big deal though, and the beer was fine for the remainder of primary fermentation.

After five days in the bucket, the bubbling in the airlock had slowed to two bubbles per minute. We moved the bucket upstairs, sanitized the siphon, piping, and carboy, and opened up the bucket. There was still some foam sitting on top of the beer, but it wasn't too bad. It was also smelling more like actual beer. :-)

We siphoned the beer into the glass carboy, filling almost all the way to the brim and dumping the rest into a measuring cup so we could see how much we had to spare at this step. The answer was "not much." We had less than a cup left over, and that was after tilting the bucket to keep the siphon going. It's not that there wasn't enough liquid in the bucket, but that the siphon can only pull liquid up until it gets so shallow that it's pulling in air. Seems like we basically need to shoot for a batch size that's a full quart more than the carboy size.

Also, during the filling the beer foams up a little, and in order to make sure you get the carboy full you have to just let the foam spill right over the carboy. Picture filling a somewhat heady beer so that beer is up to the brim, despite letting the head spill all over the sides of the glass. Next time we need to put the carboy in some kind of pan or something to catch the overflow and reduce the mess. :-)

We did have enough left over after racking to get a gravity reading, which was 1.018. Given the original gravity, the beer should now be at 5.3%. We also had enough left to taste it. It really tastes like a good hefeweizen! Flat and room temperature of course, but it does have some nice banana flavors from the yeast that we were going for. Now it's starting to feel like an excruciating wait for bottling and carbonation before we can actually try the final product. Excited that things seem to be going in the right direction though!

[ Hefeweizen Brew Day ] <--- | ---> [ El Jefe Tasting ]

Tuesday, August 5, 2014

First Home Brew - Hefeweizen Brew Day

For our first home brew, we decided to shoot for something along the lines of a Weihenstephaner Hefeweizen. After poking around for recipes online for a bit, it seemed like it was basically just wheat extract, hallertauer hops, and weihenstephan yeast. We used BeerSmith to figure out the quantities of extract and hops to use to get the desired original gravity and IBUs.

The first thing we did on brew day was run a test boil for an hour with our new brew kettle. BeerSmith has a place for incorporating the boil-off rate into the calculations, and I figured getting this drastically wrong one way or the other would mean we'd miss our target gravity and IBUs. After all the testing and guessing, we were shooting for a pre-boil volume of 2.26G, a batch volume of 1.22G, for a final volume in the carboy of 1.05G. The carboy volume was the critical part here, because too little beer in the carboy would mean too much air, which could increase the chances of contamination.

Time to start brewing! We measured out 2.26G of water, got it boiling, got our ingredients measured out, and threw the wheat extract and hops in there. It kind of tried to boil over when we added the extract. In retrospect, we should have turned off the heat, then added the ingredients, then brought it back to a boil.

The boil smelled just like Flying Barrel. We were actually brewing beer in our own house! After 60 minutes, we were only down to about 2 gallons instead of 1.5. We let it go another 15 minutes to boil of some more, but we still didn't get down to the target post-boil volume. I think part of this is because the boil off is slower with a bunch of malt extract in the water than it is with just water. Plus, the 2.26 gallon pre-boil volume should have been with the extract, not 2.26 gallons of just water and then extract on top of that. Next time we'll add the extract then add more water to bring it up to the desired volume.

During the boil, we got everything sanitized and ready to go. We put the kettle in ice water in the kitchen sink to cool it down after the boil (we should have bought more ice), then siphoned the wort into the fermenting bucket, pitched the yeast, put on the lid, and put on the airlock.

We got an original gravity of 1.058, which was actually slightly higher than the 1.054 we were shooting for, despite using too much water. So it was a relief that the water difference didn't mess us up. We put the bucket down in the basement, which stays about 64 degrees, and the brew day was done!

---> [ Hefeweizen Rack to Secondary ]

Monday, August 4, 2014

Initial Home Brew Setup

Once we got the idea to make a one gallon batch, we bought most of our initial home brew supplies during one of our trips to Flying Barrel while making our wine. That first trip of stuff was:

sanitizer
6.5G fermenting bucket
auto siphon
airlock
wort aerator
bottle washer
grain steeping bag
Smack-pack of Wyeast 3068 Weihenstephan

We had originally planned to buy a 1-gallon wheat beer kit from Northern Brewer, but at some point after the Flying Barrel trip, we decided to just buy the ingredients ourselves. I also read more about the benefits of racking to a secondary fermenter, and decided we needed a carboy. And we figured out that our scale wasn't specific enough for measuring the right amount of hops to go into a one gallon batch. The next trip was to Annapolis Home Brew:

Spray bottle for the sanitizer
1 gallon glass carboy w/ plastic top w/ hole
test tube for measuring gravity
dry wheat extract
german hallertauer hops
scale that measures to the tenth of a gram

And finally we had everything we needed! Actually, not quite. We stepped through the process looking over our equipment, and realized the auto siphon didn't come with any plastic tubing. I also started to realize that just using 8qt stock pot wasn't going to work, since all the boil-off and other losses meant we needed an initial boil volume of at least 2G to do a full volume boil. One more trip, this time to Maryland Home Brew:

5' of plastic tubing
2G fermenting bucket
20qt brew kettle

Okay, finally now we did have everything, and it was time for our first ever home brew!

Sunday, August 3, 2014

Desert Penguin Origins

A penguin was driving through the desert...

In June of 2005, Paul and I went with a big group of friends from work to brew some home brew at Flying Barrel in Frederick MD. They have a brew on premise option where you pick a recipe, use their equipment to brew 5 gallons of beer, let it ferment in Frederick, then go back two weeks later to bottle. Paul and I teamed up to brew a red ale similar to Killian's Irish Red.

Paul bought some label paper and we designed a label for our first home brew collaboration. We picked the name "Desert Penguin" based on the very funny joke about a Penguin trying to beat the desert heat in a grocery store while his car was being fixed by a local mechanic.

In 2006, Paul also went to Flying Barrel with his mom and made a Belgian white. At some point, Amy had taken her dad to Flying Barrel and made a fairly good milk stout. In general, our brews didn't turn out too badly, but they clearly weren't world class craft home brews.  :)

We haven't brewed beer for years, but we've spent that time tasting and enjoying some pretty fine beer. Paul started listening to the BeerSmith podcast with no intent to get back into brewing, just for general beer knowledge and enjoyment. But, one podcast talked about small 1 gallon batches and the spark was lit! The one gallon batches are much more manageable for an in home brew setup and allows you to experiment with more recipes without having to drink 2 cases of less than ideal home brew.

So, we decided to get back into it on an easy, small-batch scale. We feel like we have the knowledge about good beers and what we like to aide us in setting tastier targets for our brewing. We'll be shooting much higher than Killian's!

Prost!
-Amy

Wednesday, July 23, 2014

Home Brew Blog

Welcome to our new blog! Amy and I will be using this space to write about our adventures in home brewing. If you're looking for expert brewing tips... you've come to the wrong place. We're just noobs getting started in the hobby and we thought it would be fun to keep a record of what we're doing.
If you know us (and why else would you be reading this blog?), then this blog should also serve as a nice preview of what concoction you'll get to try next time we get together! There should be a little thing on the right that will let you get e-mail updates when we add new posts. Sign up!
As I write this, we have our first home brew conditioning in the secondary fermenter in our basement. In the next few posts, we'll try to catch the blog up on what brewing we've done in the past, how and why we got back into it, and the story behind the "Desert Penguin" name.  :-)

Cheers!
-Paul and Amy